








Swordland Showdown is a bi-weekly event , and always happens on a Sunday . There are 3 stages involved, the voting phase where your members can register their preferred time slots, the sign up phase , alliance members have 2 days to battle request for the legion and its corresponding time slot, or abstain from the legion that they are unable to participate in.
While both legions can be set at the same time, it makes sense to split them across 2 different time slots to accommodate more players overall.
Legion 1 should be given priority for your strongest/most active players, as the result of legion 1 affects the rewards for all members in the alliance, and since 40 cannot participate, this can be a crucial income for resources.
[PRO TIP: there is a limit of 30 participants per legion, the 10 substitutes for each legion can only join if there are people who didn’t show up ie. less than 30 entered. Specifically, after 3 minutes substitutes can take up the missing slots until all 30 spots are used up, so first come first served!]
Matchmaking is based on several factors, such as time slot, power level of members and number of members. Your average power strength is based on the 20 strongest applicants , and your �?ranking �?is determined by this power strength ( Supreme, Master, Platinum and Gold) . As rewards scale up with higher ranks, strong legions with high power players are recommended! Consecutive winning/losing will also play a role! Always be prepared for a challenge
-If you leave the alliance before the end of sign up phase, and the phase ends, you will no longer be able to join the event. If you leave after the sign up phase, but rejoin before the start of the event you can still participate as if you never left.
Swordland Map
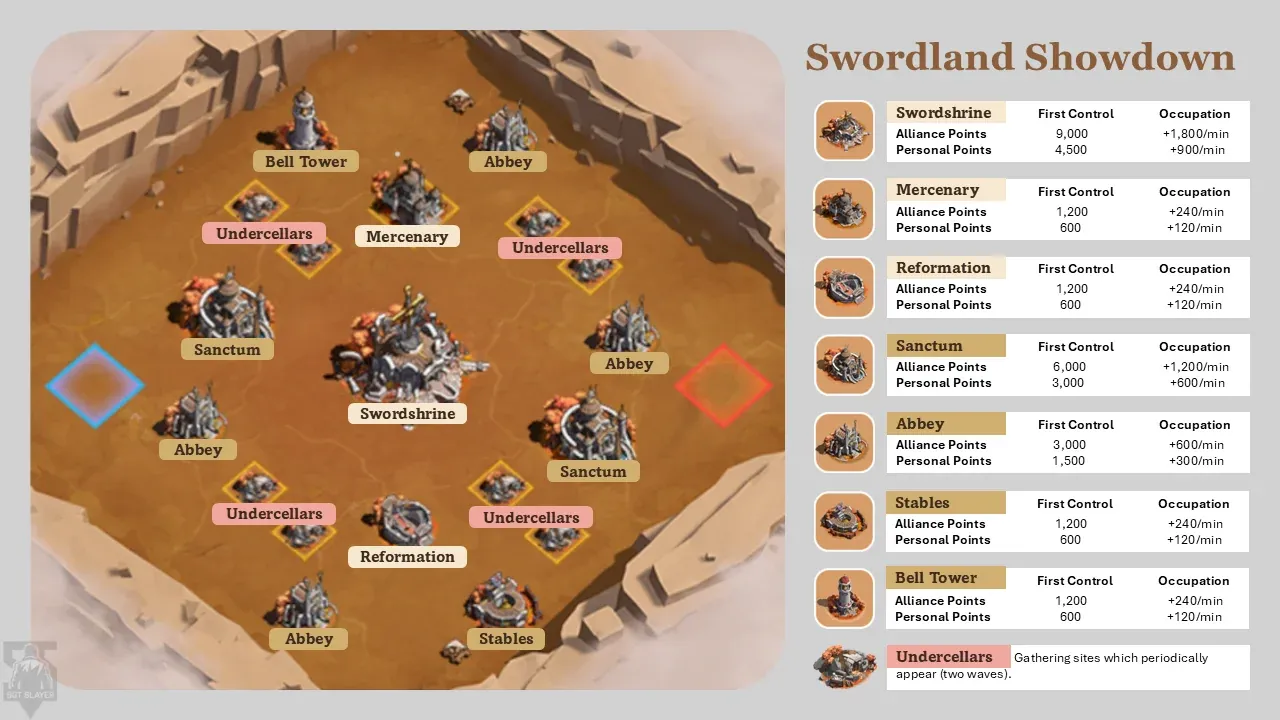
The field consists of 2 spawn areas, structures for points, structures for bonuses, and mines.
Spawn Areas:
The only time in the game where you cannot be attacked, but can attack, is the safe zone. When you enter the battlefield after the event starts, you will be spawned in your safe zone .
You will be unable to attack enemies in their safe zone, whilst being able to be attacked when you are not in your safe zone, leverage this!
Point Structures:
From highest to lowest, the Swordshrine, Sanctum and then Abbeys are the highest sources of points when controlled. Occupation takes time, and after controlling the structure, you will accrue points over time, both personal and alliance. 50% of the alliance points gained will be shown on the building, these can be stolen.
When a building changes control, the 50% points “stored�?in the building will be dropped as packages , you want to retrieve these before the enemy does, as they can swing the tide of the game. Likewise, if you see an enemy building with a large stock of points stored up, attacking this building and then picking up the dropped points can propel your alliance/personal score a lot!
There are undercellars that are akin to simple gathering, you will gain personal and alliance points from these, and may contest/be contested. In terms of value, they’re not as good but are generally ignored or forgotten, so they’re a safe route for points!
A note of warning, while the swordshrine offers the most points per minut e in the event, it is initially locked , and is exposed to constant mercenary attacks when controlled. Be prepared to heal/reinforce!
Bonus Structures:
They provide a lot less points than the other structures, but give additional effects as follows;
Bell Tower �?Reduces occupation time for controlling buildings, this will help in capturing/recapturing buildings
Mercenary �?Similar to the mercenary assaults on the Swordshrine, you can launch attacks on a building, coordinate with attackers to capture buildings more easily
Reformation �?Controlling this will give all your troops a buff!
Stables �?Reduce free teleport cooldown, critical for maneuvering across the battlefield and collecting points/attacking structures/castles
* Once you enter a building, a 3 minute countdown starts for his full control, before that you will not make any points, if you are the first to control the building after 3 minutes then you get first control bonus points, if your alliance controls the bell tower then this “capture time�?is reduced by half. Once you control a building, half of the points gathered by it will accumulate on top of the building for everyone to see. Those points belong to your alliance but if an enemy enters the buildings, all those points are removed from your total alliance points and are scattered on the ground for anyone to pick them up !
Mechanics
-There are first control rewards, spreading out and occupying as many buildings as possible is highly incentivized and recommended! Remember that a building is only considered as controlled after the timer finishes! Leverage the Bell Tower for faster occupation
-You are awarded free healing speedups as well as march speed boosts over time, use them at will!
�? A good offense is a good defense . Reinforce each other with appropriate defensive heroes such as Howard, Gordon, Saul, Hilde, etc. Helping your comrades resist attackers and forcing them to use up resources/troops is a great strategy
-Don’t be afraid to run ! There are always bigger fish in the sea, instead of losing resources/troops to them, teleport away or empty your castle -> If you send all your troops out, and get hit hard enough (ie. your castle’s health burns down to 0), you will return back to spawn. There is no loss/consequence for this! Stay in spawn if you can’t defend against enemy attacks, and join structures/rallies from spawn using speedups!